
Build a Campaign Page
You create a specific Campaign Page when you want to fundraise around a specific occasion or appeal, such as Giving Tuesday, a walk-a-thon, or an annual fundraiser. A Campaign Page is not the same thing as your Core Profile.
Before You Get Started
- Have you set up a Core Profile? It's a critical first step.
- Learn how to duplicate a closed Campaign Page.
Walkthrough
Getting started
- Log in to the Nonprofit Admin Portal.
- Click the “Campaign Pages” link in the left-hand navigation bar.
- Click “+ Create Campaign Page” to create your new page.
- Fill in the "Campaign name" field, keeping in mind that this is what will be displayed publicly. Then click the “Next” button.
Fill in campaign basic information
- Click the “Campaign Name, Description & Goal” tab in the menu.
- Give your campaign a name for internal purposes. It will not be made public, but it is the campaign name that will appear in Stripe alongside any donation made to this campaign. This name can be edited until you receive your first donation, after which time this field will be locked.
- The "Display campaign page title as" field shows the name you chose on the previous page. This is the campaign name that will appear in public. The campaign name will automatically turn into a link to the web page where your campaign page lives. Once you receive your first donation, the campaign link can't be changed, but you can still change this title.
- In the "Page description" field, describe the campaign and its goals. It may be helpful to reiterate your nonprofit’s mission. Learn more about how to optimize your campaign description. You can also add web links and format the text, adding bullets, italics, bolding and more. For best results, we recommend typing and formatting the description directly in the text-editing window, not copy-pasting it from another document. Text copied from other word processing software sometimes includes unseen code that interferes with our text-editing tool. If you already have a prepared text, copy-paste it into a text (.txt) file to strip it of unseen code and then recopy-paste it into the text-editing window, where you can reformat it.
- Several fields and check boxes on this page are identical to those you saw when you set up your Core Profile, and the settings on this page are the same as those you chose on your Core Profile. You should nevertheless review them all to make sure they are as you would like them to be for this campaign. These fields include:
+ Set the Default Frequency ("Monthly" or "One-Time) -- This is what donors will see highlighted when they visit your campaign page.
+ Allow donors to make donation private
+ Enable Peer-to-Peer Fundraising (Peer-to-Peer Fundraising pages associated with your Campaign Page inherit the chosen settings regarding private/anonymous donations, dedicated donations and default frequency, suggested donation amounts and Custom Questions; note that, at present, Custom Questions are not inherited by a Peer-to-Peer Fundraising page if it is associated with a Team Fundraising page)
+ Add a "Dedicate This Gift" link (for giving in honor or in memory of someone) - In the "Campaign goal amount" field, set your campaign's fundraising goal. Note that this automatically enables the Campaign Page's progress meter. If this field is left blank or with a zero in it, the progress meter will not appear.
- If you've raised money from other sources (like checks or cash), the "Amount raised from other sources" and "Number of offline donors" fields are where you can add offline donations and donors (no commas or decimals necessary). These totals will be counted toward your campaign goal and shown on your tracking thermometer. This can be updated at any time. If you also wish to count offline donations and donors from peer-to-peer fundraisers toward your overall campaign goal and donor count, select the "Include offline p2p fundraiser donations and donors towards this campaign's goal and donor count" box.
- The “Fundraiser goal suggestion” field is Peer-to-Peer Fundraising functionality. You can suggest a target fundraising goal for people who fundraise for your campaign. Individuals can create their own personal fundraising pages tied to your Campaign Page, and the money they raise will contribute to the campaign's overall goal.
- Enable or disable whether you would like the following options, according to nature of your campaign and what you would like to see displayed on your Campaign Page:
+ Show recent donors on your campaign page and/or via Live Display.
+ The Peer-to-Peer Leaderboard is more Peer-to-Peer Fundraising functionality. - Hit "Save" at the bottom of the page.
Brand your campaign
- Click on the “Logos, Images and Brand Color” tab. If you have completed a Core Profile, you will see items already in place: your logo, primary image, brand color and image for social media sharing. However, if you would like to change any of these default qualities to suit the specifics of your campaign, this is the place to do so. Any changes you make here will only impact the chosen campaign; they will not affect your Core Profile or other campaigns.
- To upload a new logo specific to your campaign, follow these instructions.
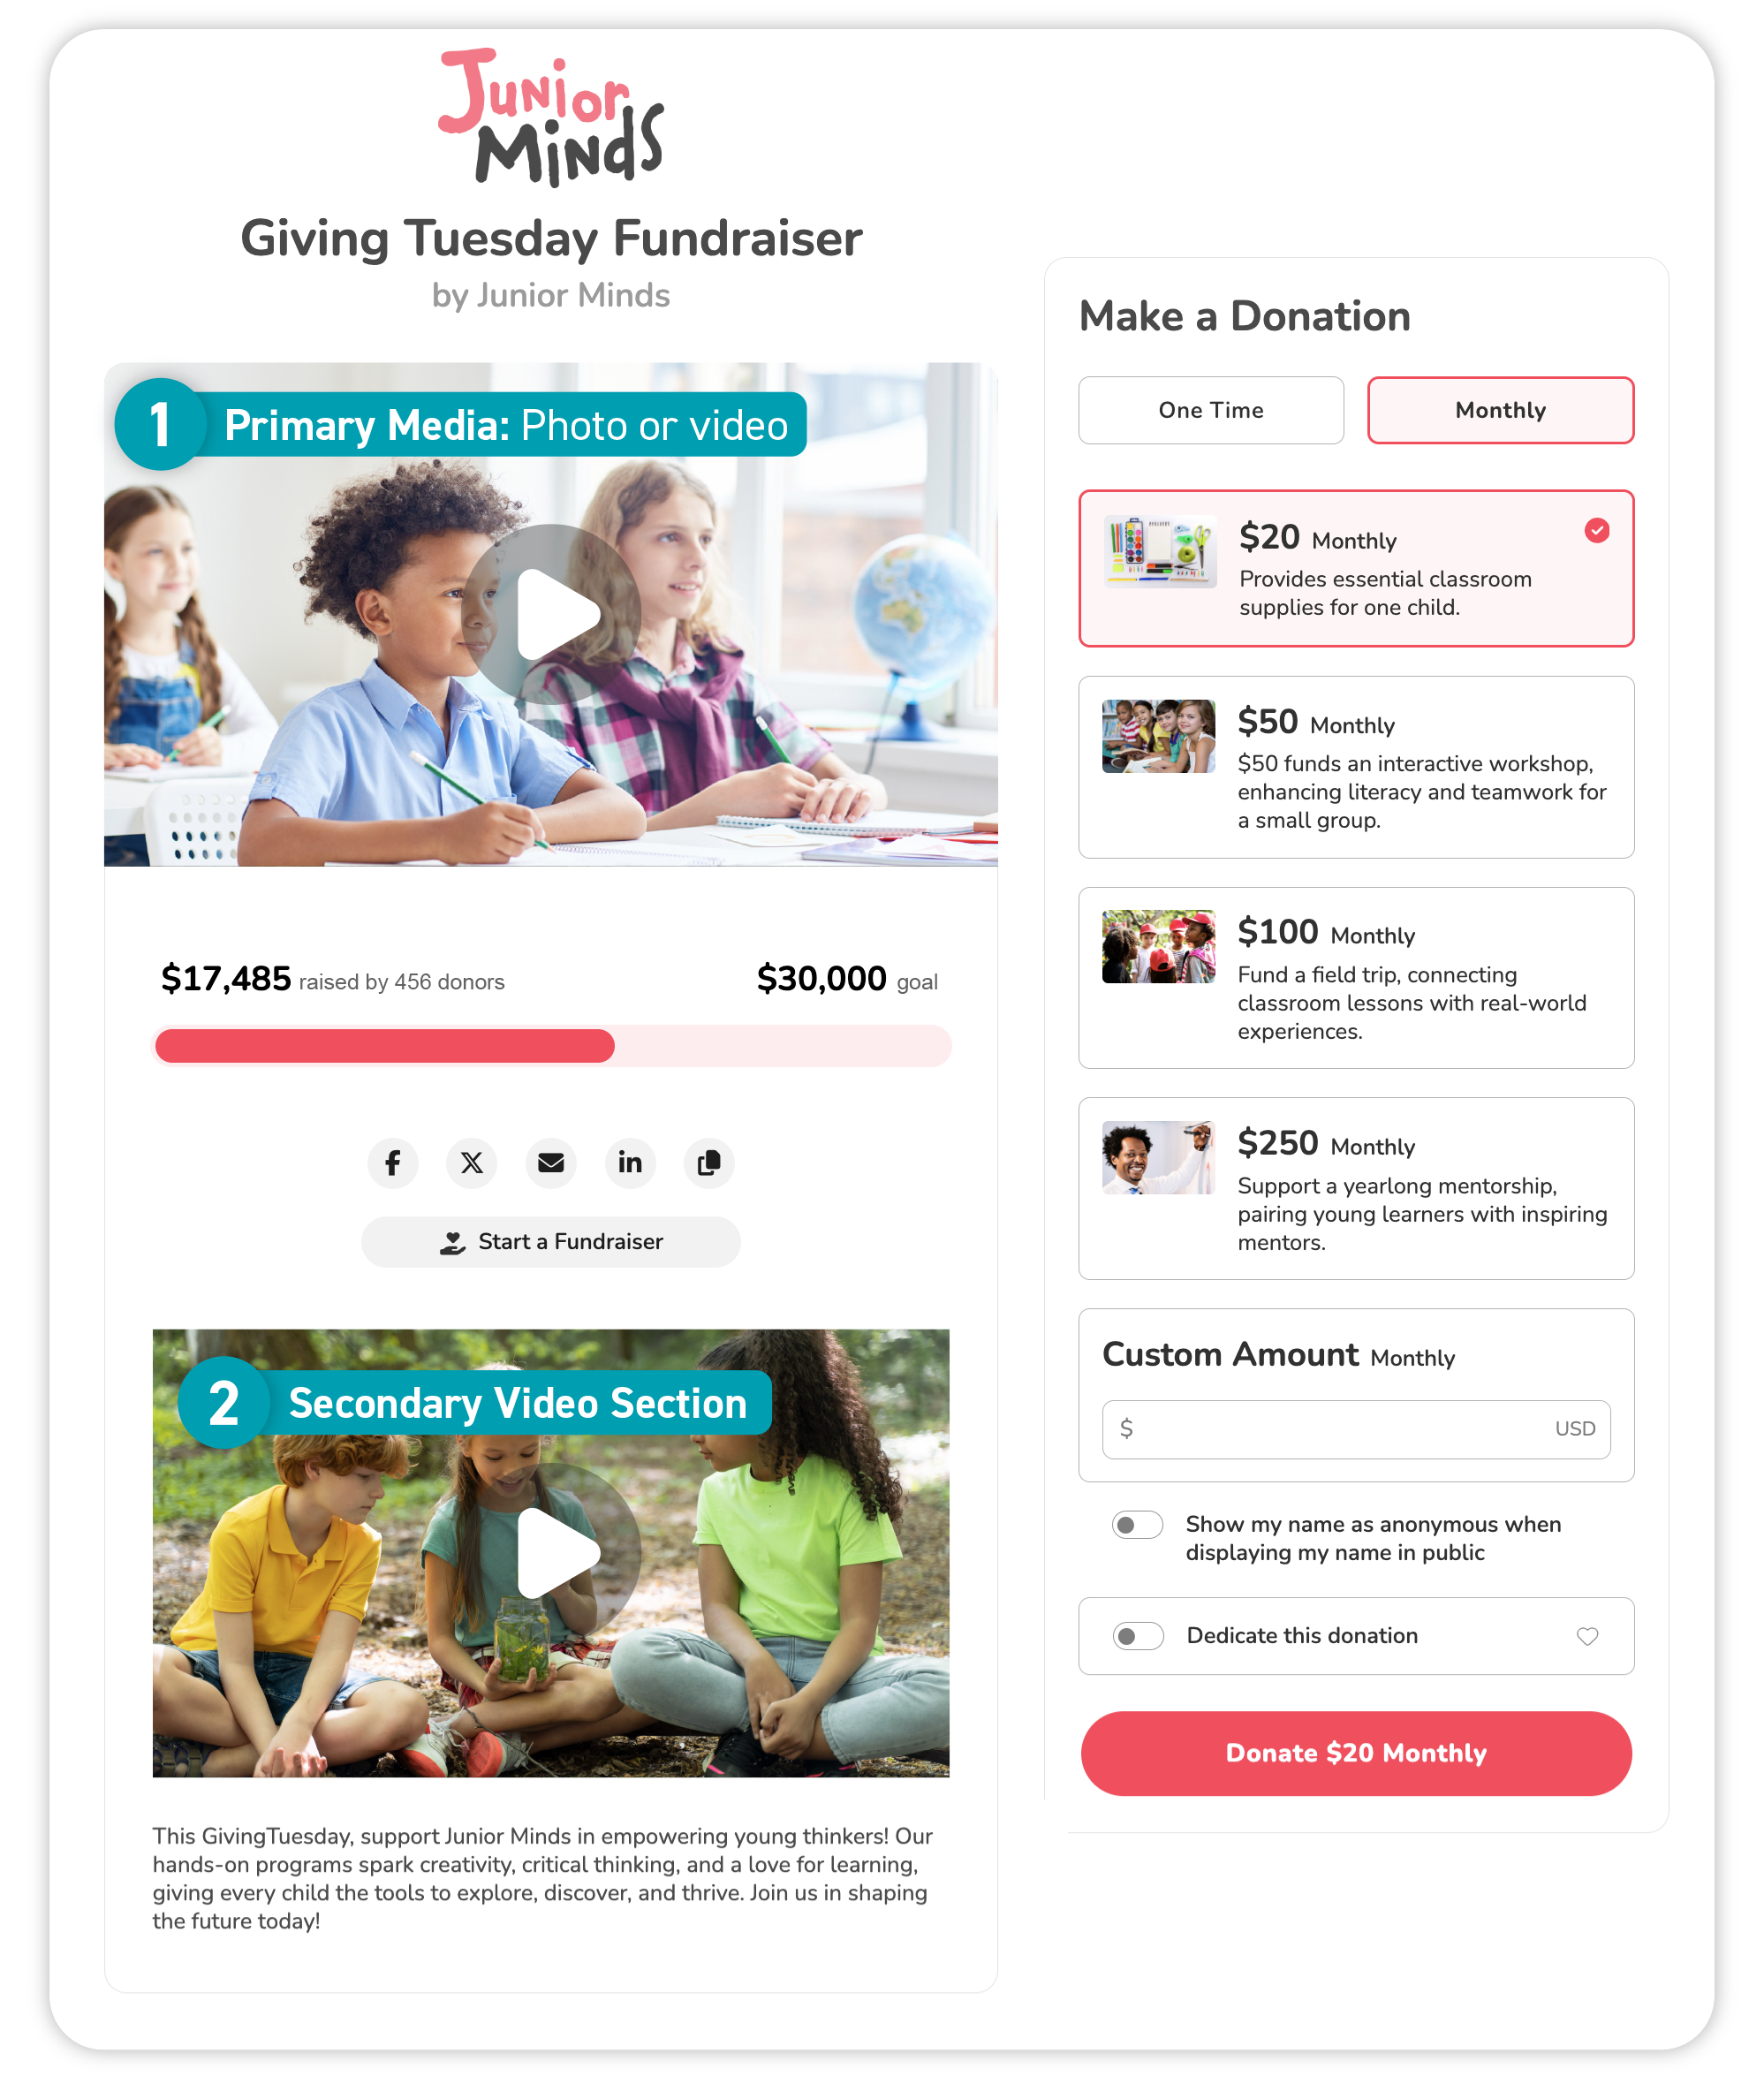
- To select a primary image or video to use with your campaign, use the “Primary Media” selector. If desired, this is where to showcase a video in the prominent position at the top of the page. For example, you can use this section to feature a livestream if you are planning a virtual event. The primary image or video does not appear on mobile screens. Choose any of the following and then select “Save” to complete the step:
(a) Default Image - The default image is inherited from the Core Profile.
(b) Image - Select “Upload new image” and then navigate to the image you want from files on your computer. A large, high-quality image is best: recommended size is 2000x1200 pixels and in JPG or PNG format. Use the image cropper to frame your image: slide the gray ball along the scale to zoom in or out; click and drag on the image to center it as desired in the fixed 5:3 aspect ratio. Then click the “Save” button. Of note: If you choose to place an image but do not upload anything, we automatically pull from your Core Profile's Primary Media. If none exists there, we use a default placeholder adapted to your brand color or campaign color, if one was set. Once you upload an image, you can replace it, but not remove it (thus, you can’t revert to the default placeholder).
(c) Video - See below to learn how to learn how to place a video in a prominent position at the top of the page
(d) No Media - No further action is required. - To change the brand color to something in line with your campaign, this is what to do. Note that, to ensure the strong color contrasts conformant with accessibility standards, your brand color is used only on some buttons, default images, icons and other small color highlights.
- To upload a new image for social media sharing, do as described here.
- Finally, the "Secondary Video Section" is where a second video can optionally be added into the body of the page. You can choose either of the following and then select “Save” to complete the step:
(a) Video - See below to learn how to place a video within the body of the page.
(b) No Media - No further action is required.
Embed a video
You are able to embed video in your Campaign Page. You can embed video in two places: (1) in the prominent position at the top of the page and (2) within the body of the page.
In both cases, you first need to click on the “Logo, Images and Brand Color” tab. If you have completed a Core Profile, you will see items already in place: your logo, primary image, brand color and image for social media sharing. However, if you would like to change any of these default qualities to suit the specifics of your campaign, this is the place to do so. Any changes you make here will only impact the chosen campaign; they will not affect your Core Profile or other campaigns.
To place video in a prominent position at the top of the page
- Scroll down to the ”Primary Media” selector. This is where to feature a livestream if you are planning a virtual event.
- Select the "Video” tab.
- Choose “Edit” and then paste in the direct link to a public video (only Vimeo and YouTube [but not YouTube Shorts]) that you wish to embed on your page. Paste the full URL (with “http://" or “https://“), not an “embed code.”
- Click the “OK” button.
- Click the “Save” button to confirm you have selected the desired video.
To embed a video within the body of the page
- Scroll down to "Secondary Video Section" where you have the option to add a second video.
- Select the "Video” tab.
- Choose “Edit” and then paste in the direct link to a public video (only on Vimeo and YouTube [but not YouTube Shorts]) that you wish to embed on your page. Paste the full URL (with “http://" or “https://“), not an “embed code.”
- Click the “OK” button.
- Click the “Save” button to confirm you have selected the desired video.
Add donation amounts and impact stories
When supporters are passionate about a cause and are clear about the impact of each donated dollar, they feel more compelled to give. The "Impact Stories" section of your Campaign Page is a great way to creatively showcase the strength of your work. Select donation amounts closely associated with your nonprofit stories or that otherwise make sense for your organization. Then inspire donors with compelling impact stories.
- Click on the “Donation Amounts and Impact Stories” tab.
- Select donation amounts closely associated with your nonprofit stories or that otherwise make sense for your organization. The default donation amounts are $25, $50, $100, and $250, but you may customize them if you wish. You must have at least one donation amount and can select up to seven of them, not including the donor’s choice. If all default amounts are deleted, the Campaign Page will only show the custom amounts.
- If you wish, you can further customize the donation amounts by adding a short impact story and/or a small image. You can make a separate choice about what to include for each donation amount – only a donation amount or a donation amount plus an impact story and/or an image.
- If you choose to include any impact stories, describe the impact a donation of a selected size would make on your organization. Remember, you only need to add an impact story for the donation amounts you select, though we urge you include one for each donation amount. The recommended length is a concise 75 characters for each impact story, and you should use active, powerful verbs and practical and verifiable examples of where the donated money goes. For example, if your organization serves the hungry, a $25 donation to your organization "Feeds four children for a week." For an organization that protects wildlife, one story might be that a $75 donation "Preserves 15 acres of forest land." Click the helpful "See Example" and "Suggestions" buttons at the bottom of the introductory paragraphs.
- If you choose to include images, select something that illustrates your mission and adds personality to your page. Make sure your images are relevant visual supports for any impact stories they accompany. Click on "Upload an image" and select a photo. Double-click on the desired image and hit the "Open" button. The ideal image size is 1200x700 pixels, but should be no smaller than 600x390 pixels. It should also be no larger than 1MB and in JPG format.
- In the "Display Amounts By" section, select whether you'd like your donation amounts and impact stories to be arranged on your page from "highest to lowest" or "lowest to highest."
- Hit "Save" when you're done.
Add custom questions (in beta)
By default, Give Lively-powered payment forms gather just enough essential information from donors for the quick, legal and secure processing of payments. However, Give Lively does make it possible for you to add custom questions during the checkout process. These help you to collect additional information that you either require or desire in order to manage a campaign and maintain strong relationships with donors.
Your decision to add custom questions should always be reviewed as a balance between the value of additional information and the risk of lower conversion rates. Generally speaking, the more information you request on a payment form, the greater the likelihood that a donor will not follow through on giving.
Learn how to ask custom questions on donation payment forms.
A note about payment forms
We have officially transitioned only to our new payment form on all of our products except Event Ticketing, which still uses our first-generation payment form for now.
With this shift, donors see several new features, including the ability to make optional tips to Give Lively to further extend the reach and capacity of our free products and services for nonprofits.
Write a thank you message
When a donor gives to your organization, a receipt is immediately sent that:
- summarizes the donation for tax purposes
- provides a link to a User Portal through which donors can directly and securely view their donation history and receipts, and manage recurring donations and
- allows for a customized thank-you message that shows gratitude, reinforces your mission and/or touches on the impact the donation will make.
Note that thank-you messages/receipts are automatically sent to every donor. Nonprofits cannot opt out of this feature. At present, thank-you messages/receipts can only be reissued by Give Lively’s customer support team.
Learn how to create a custom thank-you message for your Campaign Page.
Example of a thank-you message:

Review your Campaign Page
Take a look at your work and make any desired modifications.
- From any of the campaign setup pages in the Nonprofit Admin Portal, click the "Visit Page" button to the right of the campaign name at the top of the page. This opens the Campaign Page in a new browser window. Return to the appropriate tab in the campaign setup pages in the Nonprofit Admin Portal to make any edits. Always remember to click "Save" at the bottom of the page.
- Once your work is complete, share the Campaign Page on social media using the social sharing buttons -- Facebook and X -- to the right of the campaign name at the top of the page.
- You may also use the "Copy Link" button to the right of the campaign name at the top of the page to copy the web link of the Campaign Page. Paste this into emails or other documents.
- if you would like a notification for every donation your nonprofit receives, you can set this up in Stripe in three easy steps.
